 |
 |
||
 |
 |
|
|
||
|
|
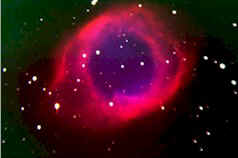
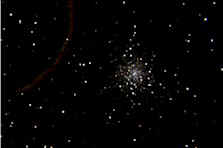
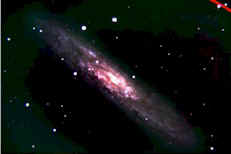
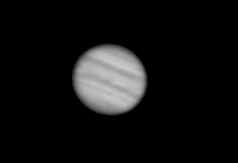
Read here for some more info about all pictures listed above: The pictures were taken using a mix of methods. Certain configurations of optics on the telescope are indicated on the title of each picture as F10 or F3.3. Some of the pictures are color, indicated by RGB, and a few use special filters as indicated. These and other codes are described below... F10 means that the CCD camera was attached directly to the telescope's raw focal length. This makes the field of view for the camera's picture 7.78 arc minutes across by 5.18 arc minutes in height. Each pixel becomes approximately .6 arc seconds in size. F5 means that the Optec WideField 5 Telecompressor was used with the camera to reduce the telescope's focal ratio from F10 to F5. This makes the field of view of the camera 15.59 arc minutes by 10.4 arc minutes. Each pixel represents 1.2 arc seconds. F3.3 means that the Optec MaxField 3.3 Telecompressor was used with the camera to reduce the telescope's focal length to F3.3 (from F10). This makes the field of view of the camera 23.6 arc minutes by 15.73 arc minutes, and each pixel becomes approximately 1.84 arc seconds in size. This configuration causes some slight distortion of stars on the outer edges of the picture. F20 means that the CCD camera was attached to a two times barrow lens and then attached to telescope's raw focal length. This makes the field of view for the camera's picture 3.89 arc minutes across by 2.59 arc minutes in height. Each pixel becomes approximately .3 arc seconds in size. It is harder to take long exposures in this configuration, so this mode is used primarily for taking pictures of planets and the moon. RGB means that a color picture was created by taking three pictures using a red filter, a green filter, and a blue filter. These three pictures were then combined to produce a color image. Note that the balance between the three colors is somewhat subjective, and the same picture can be tweaked to have several different colorful appearances. Binned indicates that the pixels that make up the normal, full resolution picture were "binned" together in groups of 2 by 2 (or rarely 3 by 3). This is used to download pictures faster from the telescope, or to see fainter objects more readily. Sometimes windy conditions make this binning necessary to hide shifts in the image. Other Filters such as neutral density filters are used for special applications like taking pictures of the very bright moon. The neutral density filter simply cuts down the amount of light hitting the camera to 25% normal levels, even to 5% normal levels. Composites are created when a series of individual shots of an object are taken, and then combined into one single master picture. This is usually done to avoid blooming (described below). The longer an exposure used for a picture, the more detail it contains, so composites are used to get that detail when one single long exposure is not practical. Blooming is when stars are so bright that they saturate the pixels around where they are located in the picture. The result is a spike upward and downward from the star, and this spike grows in length as the picture exposure gets longer. The best way to avoid this is to take an exposure that is short enough to prevent saturating the star's pixels. Filters can also be used to reduce the star's brightness. Artifacts are flaws in images from any number of sources. Sometimes a plane or satellite will cross across part of a long exposure, leaving a streak behind it. Very rarely, a very bright star near, but not on, a picture will create a faint halo in part of the picture. Also, cosmic rays can create small blotches in spots on the picture. Signal/Noise Ratio describes why some pictures look sharp and clean, and others contain more static in comparison. The CCD camera creates small amounts of noise in the picture over time, and bright skies such as when the full moon is up produce bright noisy backgrounds to the pictures. These sources of noisy, static spotted backgrounds in the pictures are best avoided by taking longer exposures. As the picture's exposure becomes longer, the object being photographed begins to dominate the noise, and eventually the noise blends into the overall black black background of the picture. This effect requires even longer total exposures for fainter objects. I.E. bright objects like planets, the moon, and bright nebulas quickly dominate the noise. Fainter objects like small faint galaxies require longer exposures to capture enough "signal" from the galaxy to over-ride the "noise" of the camera and sky background. JPEG the picture compression method used to store these pictures on this web site. The original pictures take quite a bit more memory, and contain more detail and color definition. For comparison, most of the JPEG pictures take about 30,000 bytes of storage space. The original CCD pictures are usually 765,000 bytes in size! CCD stands for Charged Coupled Device, and describes the little electronic "wells" that make up each pixel of the digital camera. The SBIG ST-7E CCD camera used at this observatory is made up an array of 765 by 510 pixels. These pixels respond to light falling on them, and produce a value ranging from 0 to 65,000 representing how much light hit them during a given exposure. The result is a black and white picture, with many shades of Grey representing the stars, etc making up the picture. Magnitudes for astronomical objects are not linear, as you may well know. To compare the brightness of two objects, subtract their two magnitudes. The following chart can be used to look up the effective difference in brightness between two objects...
|
Most of the text description for the pictures is extracted from The Night Sky Observer's Guide, Volume 1 + 2, by George Robert Keppler and Glen W. Sanner. Published by Willmann-Bell,Inc. 1999. web site at www.willbell.com
Copyright © Blueberry Pond Observatory, 1999. All rights reserved.